Just a shade over 3 years ago, I developed a nasty case of target panic. It was terrible. In fact, I don’t even like bringing it up. Often, when talking about the “subject” with other bowhunters, I typically abbreviate the name of this nasty archery nemesis. So, in an effort to ease my archery anxiety and stay true to form, I’ll simply refer to it as TP.
TP comes in many forms: not being able to place your pin on the target, punching the trigger the moment the pin hits the area you want the arrow to impact, hanging up high or low of your intended point of aim, not being able to even anchor. I could go on and on.
Regardless of how TP has or is affecting you, it quickly takes the fun out of archery and can flat out make the moment of truth miserable.
Personally, I stayed in denial about my TP for a long time. I didn’t want to accept it. I figured I could simply shoot more arrows and just fight my way through it. Wrong! It wasn’t until I missed a pair of Pope & Young whitetails during back-to-back hunts that I decided to take action.
First, and I highly recommend this to anyone suffering from TP or anyone who just wants to become a better archer: Get an archery coach. Second, I learned, thanks to my coach, to master a back-tension release. Guess what? My TP is long gone. In fact, I’m shooting better than ever and plan to hunt with a pure back-tension release this fall (more on that later). And even if you don’t ever plan to hunt with a back-tension release, you’ll find the accuracy and TP relief you’re looking for by practicing with one regularly.
Of course, there are those of you who don’t battle with TP and simply want to add an element of consistency and accuracy to your game. In my humble opinion, back-tension releases (also called hinge releases), if practiced with regularly and mastered, will simply make you a better archery shot.
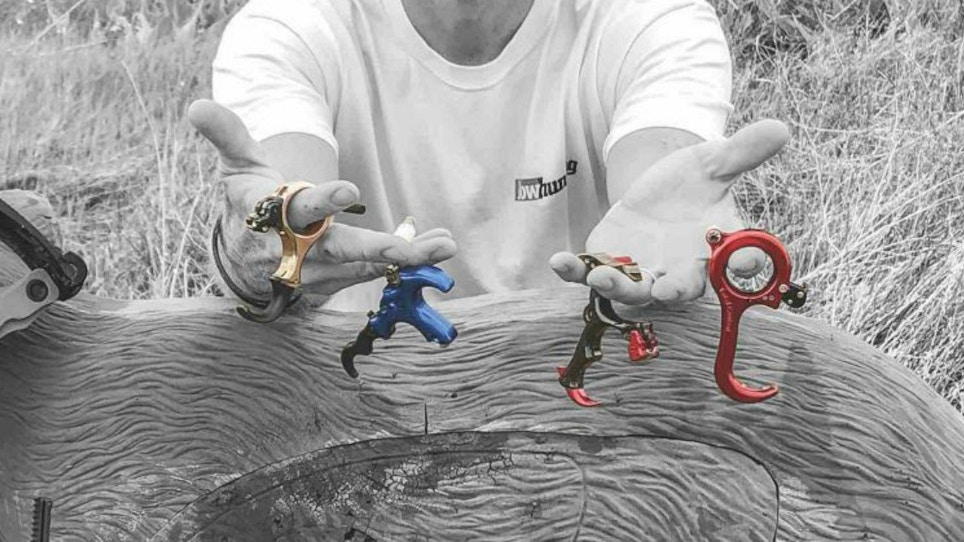
Releases are expensive, and hinge-type models are no exception. So, if you’re in need of some TP relief or just wanting to jump headfirst into the back-tension ocean and the above ink sounds appealing, I did the homework for you. Here are four solid back-tension releases you can feel comfortable putting your hard-earned Benjamins toward.
Carter Enterprises Total Control ($210)
It’s called the Total Control, and after weeks of shooting it, I can see why. Light and airy but solid as a rock, this beauty of a hinge feels great in the hand. Though at first glance it appears to be long and a tad bulky, it simply isn’t. This three-finger hinge melts into the hand, and the gnarled silver thumb peg falls perfectly into the thumb-knuckle area and provides a secure grip.
As for adjustment, this back-tension release delivers it in spades, and it’s actually the release’s adjustment ability for which it’s named. Best of all, you don’t need a Harvard degree to make those adjustments. The release sports a pair of independent moon adjustments, giving the archer infinite control of both the speed and clicker-length adjustments. Best of all, perhaps, is the fact that the Total Control has easy-to-identify index marks engraved into the head to ensure precise position referencing. You can literally loosen the two adjustment screws and walk the head of the release to the right or to the left.
When it comes to making adjustments, first loosen the pair of locking screws located on the release body just below the back of the release head. This is accomplished using a .05 Allen. Once the locking screw is loose, locate the pair of primary control adjustment screws. These screws are located in a pair of holes right where your middle finger rests against the back of the release body. The moon on the right is the smaller moon and controls the speed of the release. Using a .35 Allen, make ultra-slight clockwise or counterclockwise modifications. When making adjustments, I held the release out in front of me with my right hand and made turns with my left, this way I could watch the needle point on the body follow the laser-engraved marks on the head. Note: A clockwise turn creates a slower speed, while a counterclockwise turn increases the speed. Again, make micro adjustments, and each time an adjustment is made, lock the locking screws and then shoot a few arrows.
Once you reach your desired speed and head position, unlock the locking screws, grab that .35 Allen and start tinkering with the small hole on the left. This moon controls the click, and by turning the screw clockwise, less rotation will be required after the click. Turning the screw counterclockwise will require more rotation after the click. Again, less is more, and once you have your desired setting, snug down each of the locking screws.
As far as shootability, I fired hundreds of arrows from the Total Control over the 14-day testing period, and not once, after finding and anchoring in my desired settings, did I hang up or have any type of control issues. Oh, and you just have to shoot this back-tension release to truly appreciate its smoothness. I also found, after shooting the release for a spell, that I liked the grip-less handle. There is something about the straight-handle design that just starts to feel right the more you shoot this release. My index-finger found the circular hole just fine, and this design is really comfortable and ushered in a sense of confidence when drawing.
When it comes to accuracy, the Total Control, because you can alter its settings to your exact liking, just fills you with confidence. It is crisp, clean and if you do your job, it will only complement your accuracy. I highly recommend giving it a go.
Stanislawski PerfeX Resistance ($270)
A stunning blue-on-black handheld that comes in small, medium, large and x-large sizes, Stanislawski’s PerfeX is the ideal choice for those looking to dip their toes in the back-tension (hinge) ocean. Why? Because the second half of the releases name says it all — Resistance. That’s right, the PerfeX Resistance will only fire after you reach full draw, release the safety lever (more on this later) and continue to pull as though you are trying to actually draw the bow back even further. Once a certain amount of activation tension is reached, the release will fire. It’s an awesome concept, and one that really teaches the shooter to crawl into his/her anchor, aim, aim and execute a perfect shot.
First, find the activation tension screw that is located on the backside of the release just below the thumb attachment. Using a 5/64 Allen, turn the activation tension screw clockwise until you feel the screw bottom out. Do this process slowly, and do not overtighten the screw.
Now that the PerfeX is set at its heaviest tension, load an arrow, draw back, crawl into your anchor and start pulling. Note: Be sure to keep pressure on the thumb peg throughout the draw cycle and only release pressure on it once the desired anchor point is reached. Releasing pressure from the thumb peg while drawing the bow will cause the release to fire. Set at such a heavy setting, it’s going to freak you out a little if you’ve never shot a resistance or back-tension release, and you’re going to have to pull back really, really hard. This will give you an idea of how much pressure it takes to fire the release at its heaviest setting. All you need to do now is load the release by pushing the thumb knob forward, which locks the open hook into place and back the activation set screw off (turning it counterclockwise) a quarter turn at a time until you find your exact setting. As you start to hone in on your exact setting, I highly recommend starting to make those 1⁄4-, 1⁄8- or even 1⁄16-turns. It’s also a good idea to put a dab of model paint or use a black magic marker to make a dot on the activation tension screw and the release. This way you can always check your settings.
Once you get familiar with the release and set your desired resistance, it’s time to start tinkering with its many other customization options. The release comes with five different thumb-post length options as well as a pair of knob systems. Changing thumb-post length is a breeze. Simply remove the pair of screws that hold the post in place using a 5⁄64 Allen. Then insert the same 5⁄64 Allen into the back of the thumb knob and release the post. You can now swap out posts, and you can also rotate the position of the thumb peg to your liking.
The PerfeX can also conform to a three- or four-finger release. My Long Neck model came as a four finger, but the simple removal of a 3/32 screw located in the back of the handle and the pushing out a small dowel pin makes the swap easy. You can also customize the position of the finger extension by slightly loosening the screw and adjusting the angle.
This back-tension release is a blast to shoot. It’s lightweight and feels great in the hand, and in my opinion, is the perfect choice for someone struggling with that awful TP syndrome. Of course, it would be equally effective for those chasing heavy-horned critters or seeking a place on the podium. Once I reached my desired resistance setting, customized my thumb knob and adjusted the degree of my finger extension, I got really comfortable with this release really, really quickly.
T.R.U. Ball Fulkrum Flex ($260)
It’s small, it’s compact and it’s sleek. I love it! Yes, the Fulkrum Flex stole my heart from the get-go. Besides its racy look, the release felt great in the hand, and its heavy-brass nature along with the adjustable (two separate holes to choose from) gnarled thumb peg simply gives the release an exceptional in-the-hand feel. Picking up this release and placing it in my grip was like picking up that perfect bow — you know that one amazing vertical rig that just feels like it’s a part of your body.
As far as set up and adjustments, this back-tension release is headache free. Fitted with an onboard micro-adjustment tool located on the opposite side of the thumb-hole peg, making customized adjustments is a breeze. Start by adjusting the release’s travel, which requires the insertion of the onboard tool into the lock screw, which is located in the anchored unit the release head is attached to. After loosening the single lock screw, use the same tool to adjust the sensitivity adjustment screw (located just behind the lock screw right where your middle finger butts-up against the anchored release head). As with any back-tension release, less is more, and the laser-engraved marks on the head and the needle-point ridge on the release’s sear allow for exact and precise settings. A clockwise turn of the sensitivity screw will make the release hotter, while a counterclockwise turn will make the release colder. The Fulkrum Flex also has the word “HOT” engraved into the release head along with an arrow pointing back toward the handle. This helps eliminate confusion and makes the process of tuning the release to your exact liking all the easier. Once you reach your desired settings, be sure to snug the lock screw back down.
The Fulkrum, using the same onboard 5⁄64 Allen wrench tool, allows you to move the position of LAS Head to any of the release’s four different head settings. Simply remove the pair of socket head cap screws along the side of release, reposition the head and you’re good to go. It is important to note that changing the head position will move the bowstring away from the face, which will result in increased accuracy, but doing so will also change the speed in which the release operates. Personally, I found the factory head position to be perfect.
One of my favorite features of the release is the pivoting ComfortFlex Handle. By loosening the screw located in the far back of the release body right where the Fulkrum Flex is attached, you can easily manipulate the position of your ring finger to further customize exact hand position. The Fulkrum Flex is also adjustable from a three-finger to a four-finger release. The materials needed to accomplish this come with the package and are ultra-easy to install. The Fulkrum Flex also allows the user to change from a Click to No-Click option. Doing so is a bit of a process, and my best advice is to follow the detailed instructions that come in the package.
When it comes to shooing this release, it’s pure joy. The release is ultra-smooth, and because you can micro-tune the settings to your exact liking, target hang-up and other back-tension inconsistencies are zero. I fired throngs of arrows using this release, and one of the many things I appreciated is how the release allows you to settle in to your exact anchor, relax and execute. A repeatable anchor is key to consistent shot-to-shot accuracy. With this release, if you do your part, you don’t need to worry about anything else. It’s simply a tack driver that feels great in the hand and performs as advertised.
Tru-Fire SEAR ($177)
Designed with flare and oozing with panache, Tru-Fire’s SEAR was no doubt designed to raise a few eyebrows. For a release junky like me, it was eye candy. I just hoped, while inspecting the still-packaged back-tension release, that it would shoot as good as it looked.
Upon placing the release in my hand, my smile widened. The heavy brass handle sunk into my grip, and the grooves on this three-finger (can be customized to be a four-finger; more on this later) were perfectly recessed and allowed my fingers to sink in and get a good hold — a hold I found I could consistently repeat. Being able to repeat your grip perfectly each time is a big key to repeatable accuracy.
The SEAR is loaded with purposeful customization, so my first mission was to set the click. Personally, I prefer a click-style hinge; not for helping anticipate the shot, but rather I use the click as part of my shot routine. Timing plays a huge role when it comes to shot-to-shot consistency with a back-tension.
By loosening a pair of set screws on each side of the shank just below the head and then removing a small dowel pin from the head itself, the four-sided sear will spin freely. The dowel pin is held in place by a small button screw that needs to be removed so the dowel pin will fall out. Now you can rotate the sear to one of four click options (short click, medium click, long click and no click). Just know that the sear rides on the hidden-by-the-head click function. For instance, if you rotate the sear to the number III click function, you’re actually riding on the number II (medium-length) click setting. If you rotate the sear so that the number I is showing, you’re riding on the no-click setting. I loved the simplicity.
As for adjusting the hot/cold nature of the back-tension release, take note of the “HOT” labeled arrow on the release’s head. The arrow is pointing clockwise, meaning that after loosening the same pair of set screws on each side of the shank but leaving the dowel pin in place, one can manipulate the sear clockwise for a hotter setting and counterclockwise for a colder setting. I recommend starting cold and making micro-adjustments until you find the exact setting that works for you. It takes very, very little finger pressure to make the release hotter or colder.
Making the release a four-finger is simple. Just remove the set screw from the back of the three-finger attachment. After removing the set screw, the dowel pin will fall out. Now, simply take the four-finger attachment, set it into the handle, reinsert the dowel pin and snug down the set screw. The fourth-finger attachment also allows 45-degrees of adjustability, which is defined by the set screws that are in the attachment itself. The thumb post can be removed and placed in a pair of other settings, or for left-handers, be removed and added to a trio of pre-drilled holes on the release’s opposite side.
Tinkering with the different click sear settings, I found the shortest click, which is with the number II on the sear showing, to be the best option for me. As for my hot/cold setting, I found what I would dub a “happy medium” and have been shooting lights out. This back-tension release is crisp, weighted perfectly and breaks over flawlessly. It feels great in the hand, and is the type of release that builds shooting confidence.
There you have it, four solid back-tension releases that deserve a place in your archery arsenal. Personally, I’ve made the choice to hunt with a back-tension release this fall. Top-tier shooter, archery pro shop owner and absolute big game killer, Phil Mendoza, told me “Jace, hunt with the release you are most accurate with and have the most confidence in.” I suggest you spend some time tinkering and heed Phil’s advice.


